Emailing myself: the server
Pssst, did you read part 2 yet? Awesome, let’s dive in!
I remember the first server I put on the internet. I used shared hosting, installed wordpress, and blogged a bit. I’d gotten three or four posts published, and was feeling good about it. But I woke up one day and discovered my site had been hacked and defaced. My posts were gone and replaced with spammy garbage. I restored the site, but never felt good about using that platform again.
I learned you gotta keep your wordpress plugins updated! But more generally, I want any server setup to be robust, automatically patched, easily replaceable, etc.
When it comes to side projects, I need something that is easy to maintain. Server has an issue on a weekday? I probably don’t have time to spend on it. I’m focused on my real job. I don’t want to burn energy trying to remember how the server is configured.
I want to worry about the code, not infrastructure. To summarize, I want to bring up a server with these characteristics:
- One-command deploy
- Easy to tear down and reprovision if necessary
- Easy to keep patched
- Easy to scale if needed
- Auto-renewing SSL
- Under $10/month as long as it remains low-traffic
AWS enables all this, but it isn’t obvious how to do it. Learning all the AWS puzzle pieces and how to assemble them takes time and can be frustrating.
AWS Lambda
So, how are we gonna run our server code?
My first thought was to use AWS Lambda for the server side. Instead of worrying about provisioning, load balancing, and runtimes, lambdas let you focus only on the functions you need. Plus, this can be incredibly cost effective for a low-traffic app.
I need just 4 functions:
registerconfirmsendEmailunregister
I spent several hours learning how lambdas work, automating their deployment, and wiring up a custom domain.
But after testing it, I realized there was a cold-start penalty. When the endpoint hasn’t been invoked for a while, AWS shuts it down. So, the next time a request comes in, there’s a ~5 second delay to start it up.
I didn’t think this was acceptable for TapTapMail, because I want to give the user quick feedback when registering. Same thing for sending email. Users hate to wait. Especially me!
If I didn’t care about providing user feedback, I could use a fire-and-forget model, then the lambda startup time is irrelevant.
But if I want instant response times, I’m going to need to use something else.
At the lowest level, I could use EC2 and configure a server. But using EC2 directly requires more explicit setup than I would like. I don’t want to manually wire up an app server, nginx, SSL, etc. Is there something easier? Yep!
The easy-to-setup server with a funny name
Elastic Beanstalk (EB) to the rescue! I can quickly setup a new environment in EB, and deploy my app to the env with one eb deploy command. It’ll auto update with patches. And if anything goes wrong with it, I can nuke the env and easily start over.
Creating the EB env
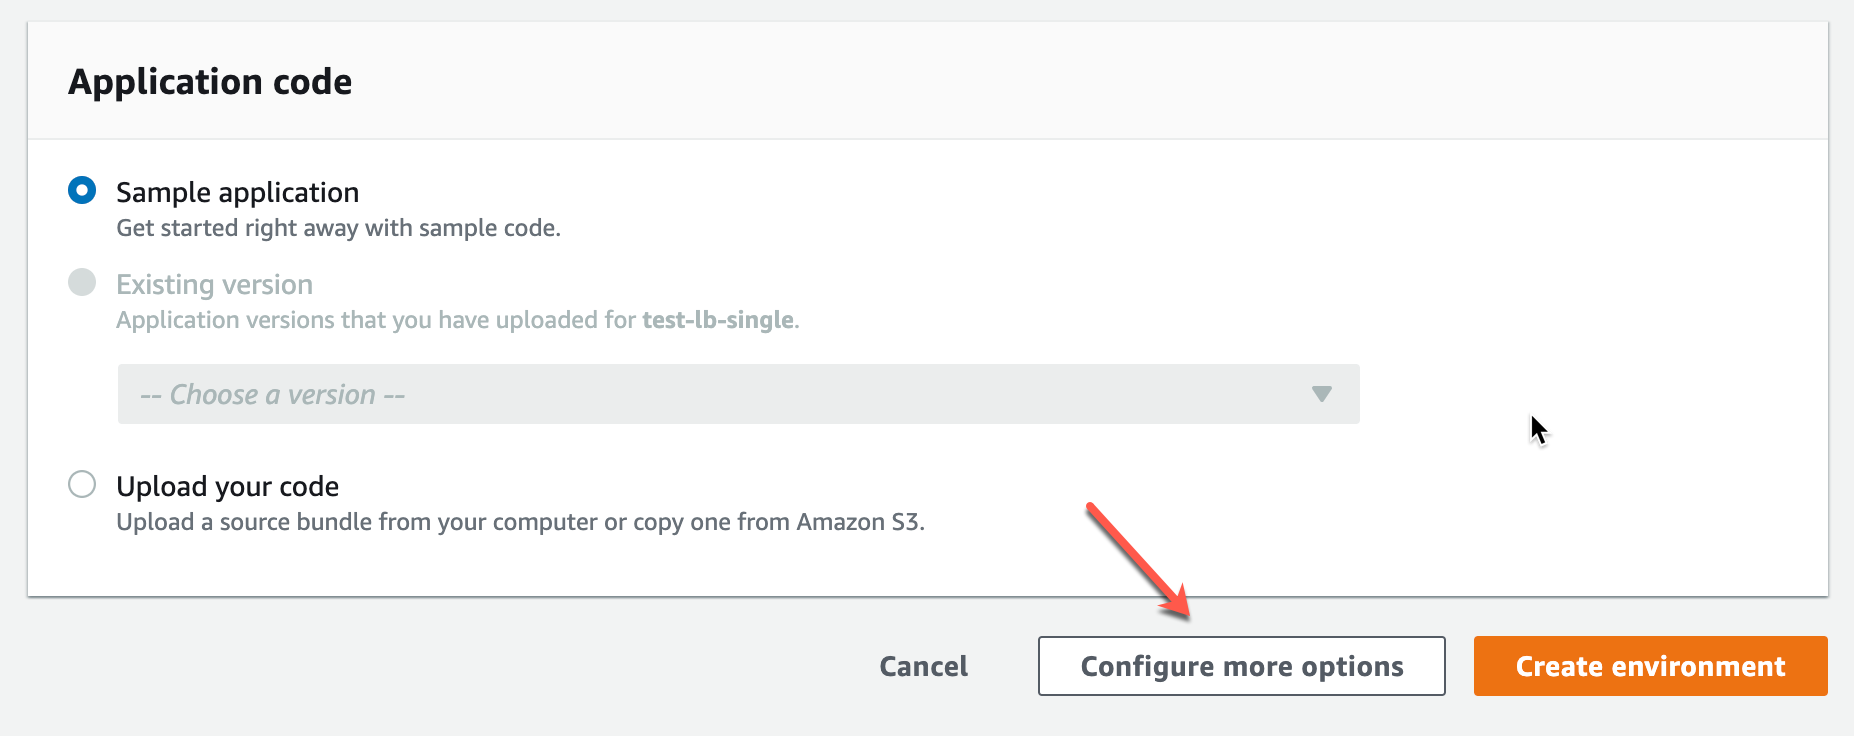
When creating a new env in EB, if you want the least expensive server, be sure to choose “Configure more options”. Otherwise, it’ll default to a load-balanced environment, which will add $16/month to the cost.
Click Configure more options…
Verify that Presets is set to single instance. In addition, if your server can run in 512MB of memory, edit the Capacity settings and change the instance type from t2.micro to t2.nano.
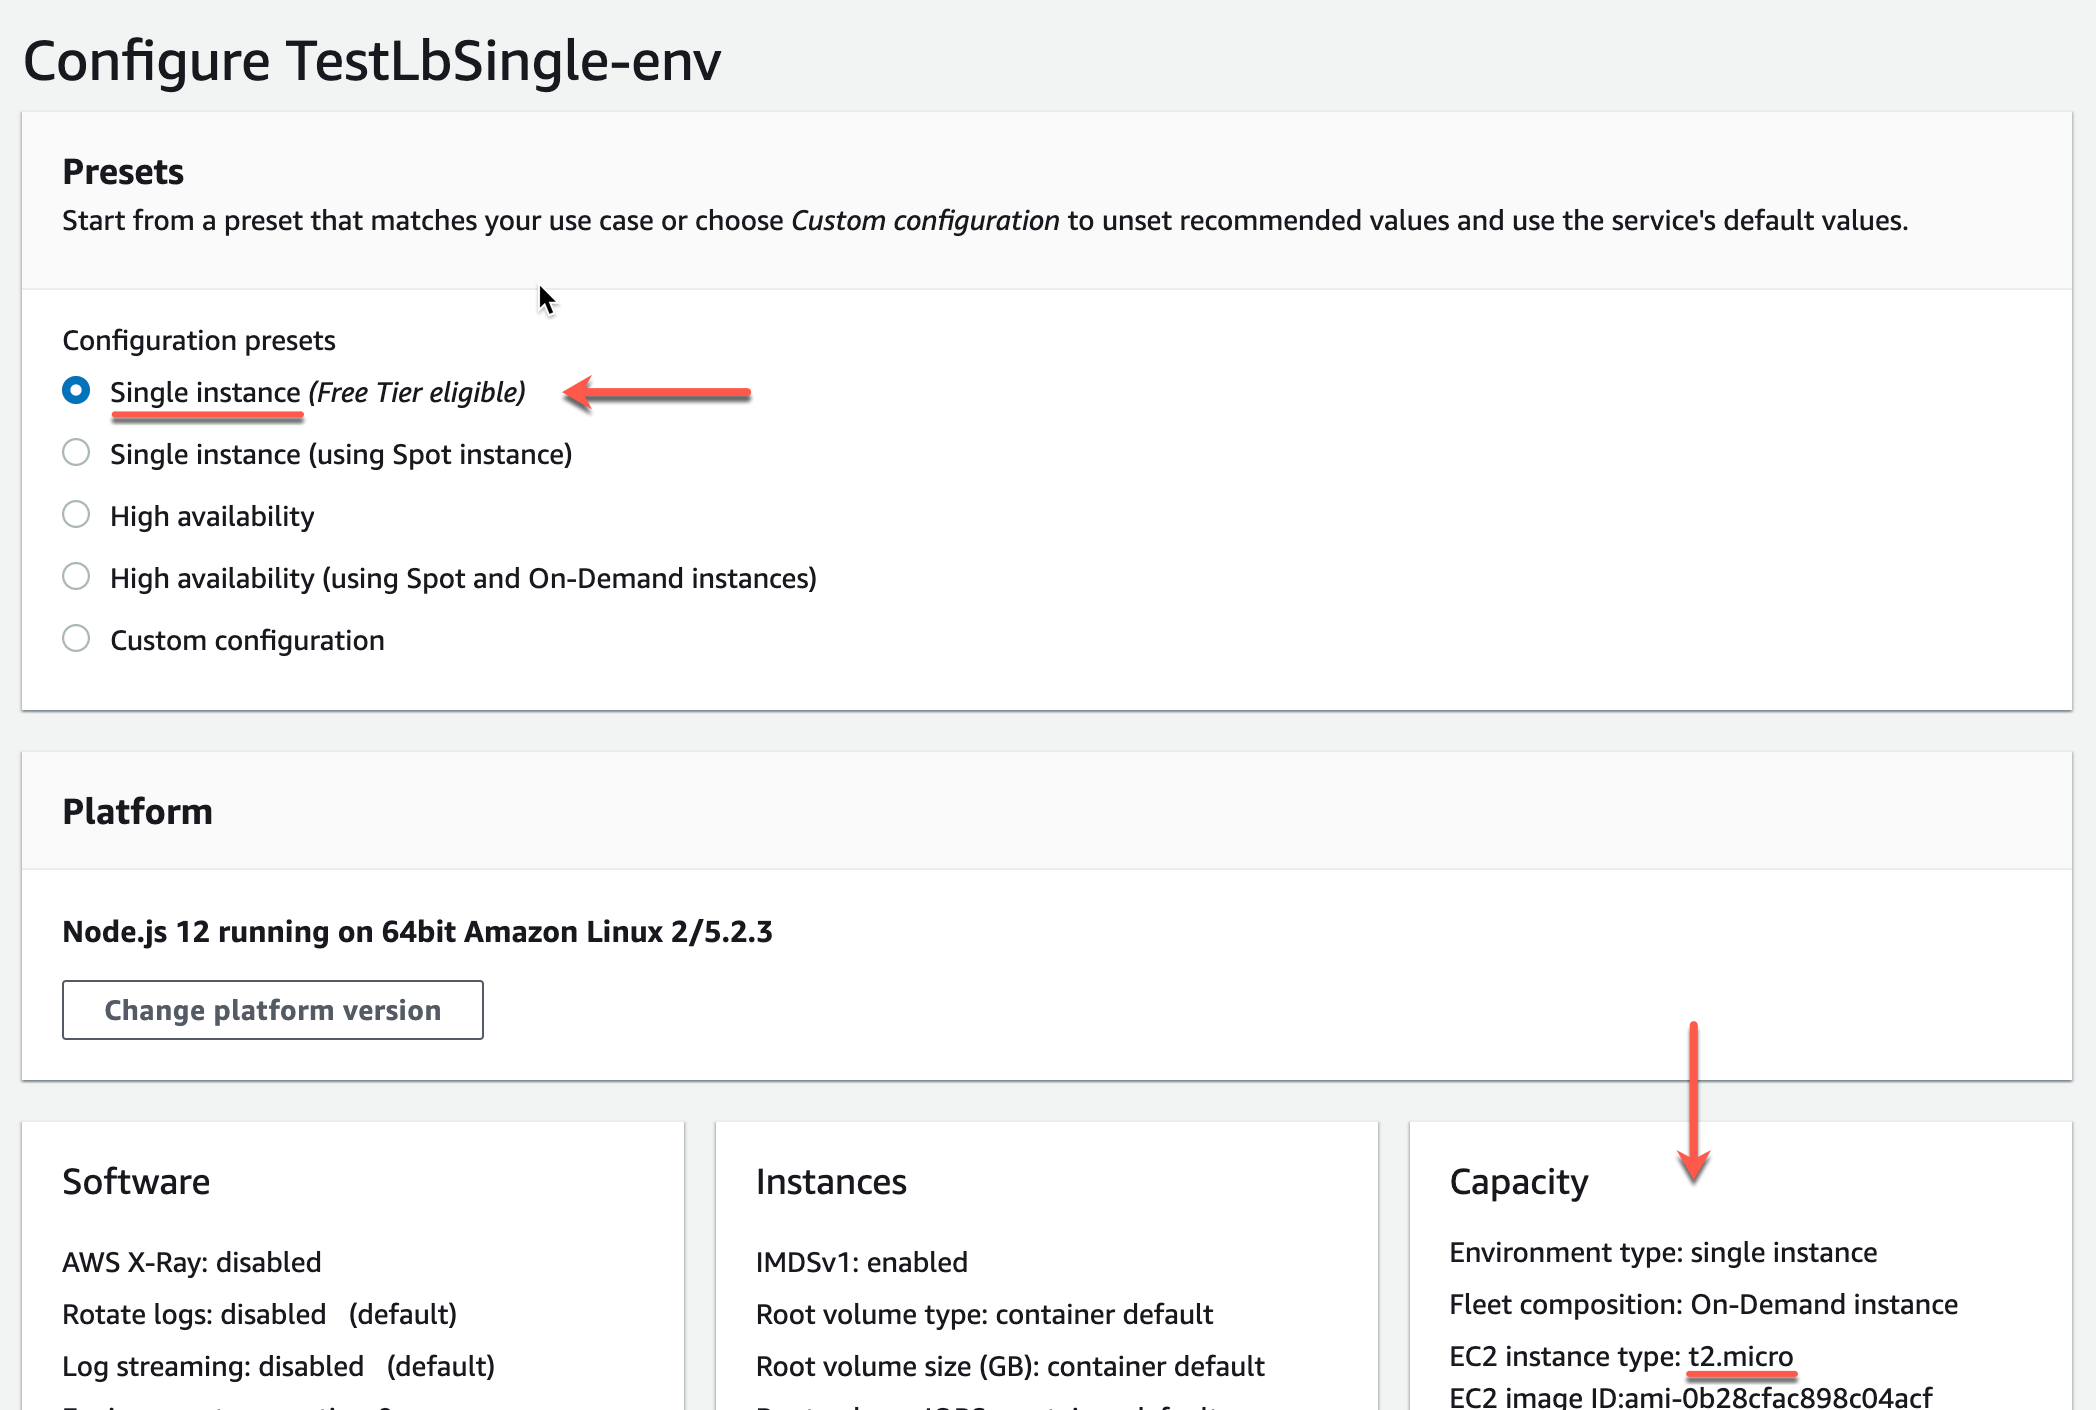
You can easily scale it up later if necessary.
So, with EB, I’ve got a Node.js server that always responds instantly, doesn’t take much memory, is easy to setup, and costs $4/month!
“Wait, Node.js?” you say?
Node.js
Node.js is my go-to server platform for small projects.
When I do a side project, it’s usually just for fun to learn a new language/platform, or I have my own problem I need to solve. TapTapMail is the latter, and I wanted to get it shipped quickly and have no maintenance headaches.
After it’s shipped and reliable, I’ll only be working on it very rarely. In cases like this, I pick something I’m an expert in, so I can occasionally pop into the code and work on it without much effort or brain bootup time.
Plus, I really like coding in Javascript. For a small app, I find it to be super low-ceremony and frictionless. Just get the job done. For a project that I’ll only occasionally be working on, this is perfect. Also, it doesn’t take much memory and runs on a cheap t2.nano instance.
S3
What about storage? The only data we need to store is a bit of user registration info.
This is a tiny amount of data, accessed infrequently, so I used an S3 bucket to store it. Any other storage option would cost much more.
RDS is $12/month, and overkill for TapTapMail. In comparison, S3 is pennies a month.
Sending Email
TapTapMail is all about sending email, so this section should be long right?
But AWS makes this a breeze. Simple Email Service (SES) is a straightforward, inexpensive way to send email (especially at the low volume TapTapMail will encounter).
After confirming your sending domain in the SES admin UI, it takes just a few lines of code to send email.
Preventing Abuse
Can a malicious user abuse TapTapMail?
Anytime you’re sending email, you’ve got to tread carefully. When implementing email sending, I spent a lot of time thinking it through to make sure it isn’t possible for someone to send email to other people.
The registration system (discussed back in part 2) ensures you own the email address and device before you’re given a corresponding client ID. So, it should be impossible to send email to an address you don’t own.
Privacy
I don’t like it when companies store information about me, unless it is essential for the operation of the software I’m using.
When I designed TapTapMail, I wanted to store the absolute minimum of personally identifiable information on the server. Not only because it’s the right way to operate, but also because I don’t want to be liable in the event of a data breach.
Let’s see what kind of information the server might know:
- The user’s email address. We’re sending email to a person, so we’ve got to know their email address, right?
- TapTapMail enables the user to send themselves a note, or a link. So, the server could have knowledge of this content.
Let’s see if we can eliminate the knowledge of these things and make sure the server isn’t storing any of it.
Hashing Email Addresses
Is there a way for the server to have access to the user’s email address only for a moment while the sending takes place? Yes.
Here’s how it works:
- When the client registers an email address, the server generates a unique, random client ID, like
21bf5b37-e0b7-42e1-8dcf-dc8c4aefc000. It also generates a one-way salted hash of the email address. The server persists the client ID and hash, not the email address. Given only the client ID and hash, it is unfeasible for an attacker to recover the email address. - When the client confirms registration, it locally stores the email address and the unique client ID.
- Later, when the client wants to send an email, it includes the registered email address and client ID in the request.
- When the server receives these, it again performs the hash on the email address and attempts to find a registration with a matching hash. If it does, it knows for sure the client is legitimately registered to send email to the address.
To abuse this, you’d have to know the client ID that goes with that email. But that pair of information is only stored on the client device, not on the server. So, an attacker would need physical access to the unlocked device.
I’m using SSL between client and server, so it shouldn’t be possible for an attacker to intercept the email/client ID on the wire.
Finally, I take care to never log the email address, client ID, hash, or the content being emailed.
Auto-renewing SSL
So, we’ve got our server implemented in a safe, easy-to-update way. But, there’s one more thing to do. We still need to setup something for an auto-renewing SSL certificate.
It took a bit of trial and error, but I finally realized that the combination of CloudFront and Amazon Certificate Manager makes this seamless. And best of all, it doesn’t require any scripts or other effort to renew the certificate. It’s all automatic behind the scenes.
At first, I was going astray in the CloudFront setup. When selecting the Origin Domain Name, I was confused because the dropdown menu doesn’t include EB environments. The closest thing was “Elastic Load Balancers”, but I’m not using a load balancer.
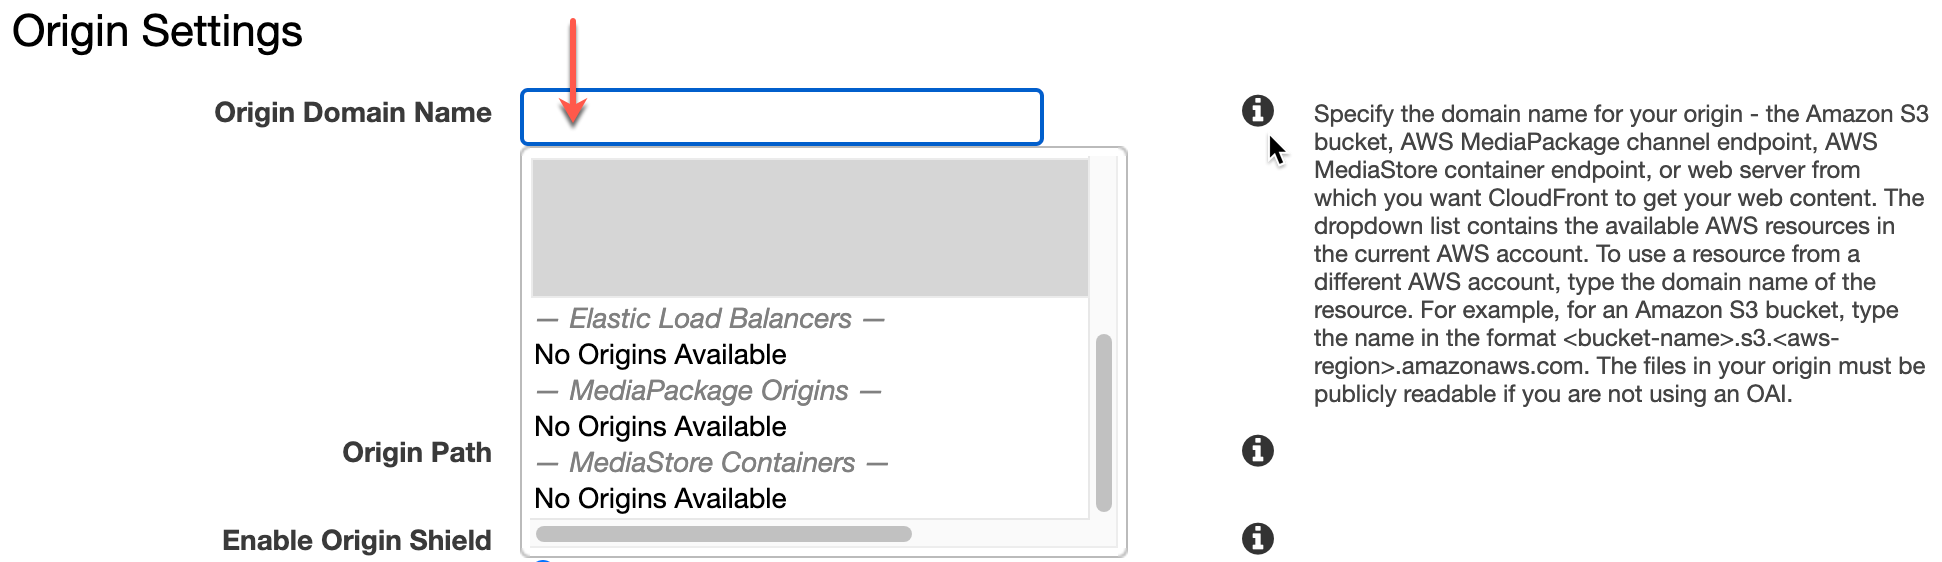
The info icon was actually helpful. I learned you can just put any origin URL in there. So, you just need to copy the URL from the EB environment, such as your-env.elasticbeanstalk.com.
Another catch is that you must create your SSL certificate in the us-east-1 (N. Virginia) region. It’s fine if your other resources are in other regions.
Monthly Costs
Let’s take a look at the monthly costs. Note that AWS doesn’t directly charge for things like EB, so you see the underlying EC2 cost.
| EC2 t2.nano | $4 |
| Route 53 hosted zone | $0.50 |
| Domain registration | $1 |
| S3 | pennies |
| SES | pennies |
| CloudFront | pennies |
| SSL certificate | free |
| Total monthly cost | about $6 |
It took some learning and experimenting to get here, but I’m pretty happy with the result. I’ve got a server that should be easy to maintain. And also easy to understand when I need to occasionally pop in to work on it. If there’s a similar cost, easier to configure/maintain approach, send me a note! I’d love to learn about it!
In part 4, we’ll get TapTapMail in the App Store!